
- Scanning
- Retouching
- Restoration
- Examples
- Estimates

Unless they were shot with a digital camera, most photographic images have to be scanned and saved in one of several digital formats before they can be used in a website, or sent as an attachment in an email, or incorporated into promotional marketing materials. Don't have a scanner? I do, and I can convert the images for you.
And don't think I can’t help you just because you have no need to insert a photo into a web page or attach something to an email or have a business or other activity to promote. Maybe what you have are boxes of 35mm slides. Maybe you are wondering just what is captured on all of those negatives at the bottom of a drawer. Maybe you have photo albums filled with memories that you would like to ensure are around for your great–grandchildren to enjoy.
Whatever you have, I am sure I can digitize for you. And if I can’t, I’ll tell you straight out. There are three levels of scanning service from which you can choose:
- the high–resolution file(s) only (no retouching)
- minimally retouched high–resolution file(s), which includes basic cleaning and cropping only
- fully retouched high–resolution file(s), which includes the more extensive services [described in the next panel]
- an option to include low–resolution file(s) in addition to the high–resolution versions
Together, we can achieve a scanning solution that is right for you, but please note that the quality of any digital scan will in large part depend upon the condition of the original.
Next: Retouching
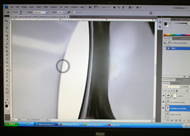
Not all images are created perfect. That’s where retouching comes to save the day.
Digital retouching covers a range of possibilities. Maybe you just need your “raw” images cleaned up, cropped a certain way, or have one particularly unappealing element edited out. On the other hand, perhaps your images need more serious help, like re–balancing the exposure or tonal levels . . . adjusting the color or punching up the saturation . . . or perhaps compositing elements from one image with another.
I address all of these needs with two retouching services:
Basic Retouching
- Minimal cleaning of image imperfections
- Straightening
- Cropping
- Extensive cleaning of image imperfections
- Straightening and cropping
- Adjustment of contrast, levels, and/or exposure
- Color correction (balance, hue, saturation)
- Re–balancing shadows and highlights
- Silhouetting elements to remove the background
- Extracting and/or replacing unwanted elements
- Merging or compositing multiple images together
The condition of the original image will obviously have some bearing on how successful the retouching process can be, and I will honestly tell you whether I think the time necessary to achieve the right result is going to be worth the cost.
Next: Restoration

Sometimes, images get so damaged by age, neglect, or outright abuse that it seems the only thing to do is toss them into the trash. But there is another course of action we can try: restoration. We can often bring them back to life by using standard and advanced retouching techniques.
With old photographs, perhaps there is a hole or a number of creases running through them . . . or maybe their color is just washed out. And slides, too, not only lose their color and vibrancy over time, but the delicate film can also crumble away leaving a gaping hole. (Or holes, plural, like the illustration on this panel.) Negatives, on the other hand, can turn dark, rendering an almost unviewable image, so they may not be optimal source material for a restoration project, but you never know for sure until you try.
There are no guarantees, mind you, that every image can be saved using restoration techniques. But if you have a beloved image that has lost its lustre, bring it to me and I’ll do my best to bring it back to life for you.
Next: Examples
Scanning & Retouching Illustrations
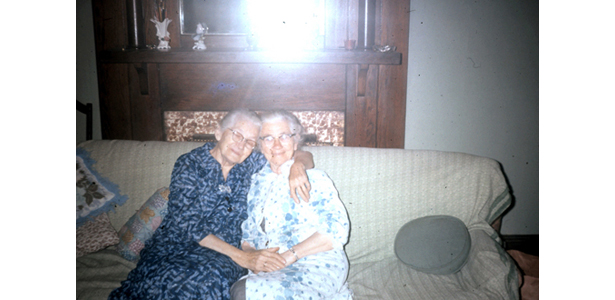
The above photo is an example of a simple scan. The original source was a 35mm slide, and the only work done to it at this stage was cropping the image out of the slide’s paper frame.
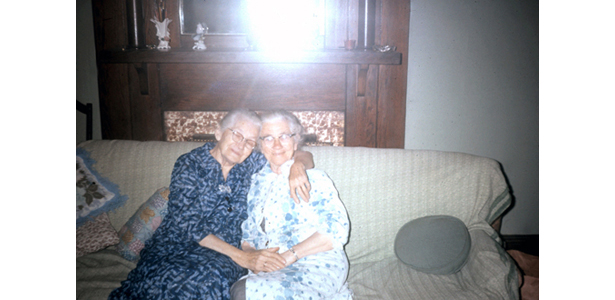
Here, the same image has undergone only a few minimal adjustments. The contrast, light and color levels have been slightly rebalanced, and a few bits of the dust and dirt have been edited out. If you look closely, you can compare where a blob of mold just above the head of the woman on the left has also been removed.
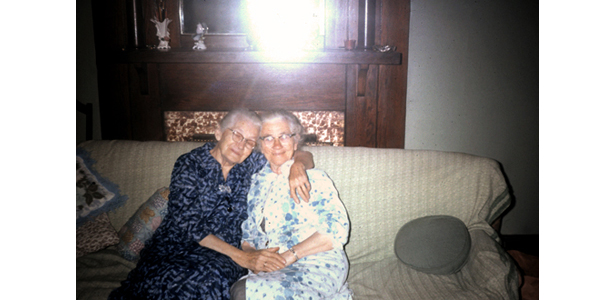
Above, you can begin to see what more advanced retouching techniques can do to revitalize the image. The colors have been enhanced; highlights and shadows have been made sharper, and more care has been taken in cleaning dirt specs.
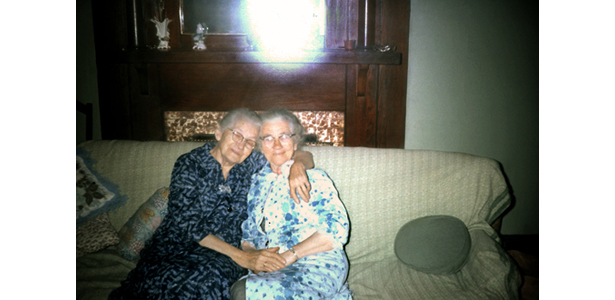
In the final example from this series, additional steps have been taken to minimize the reflection of the camera flash in the mirror. This is about as far as one can take this particular picture, as there is not enough information in this image to reconstruct the data obliterated by the camera's flash. In terms of preservation, the next logical step would likely be to crop the image so that only the two women appeared in the frame.
Before & After: Image Restoration
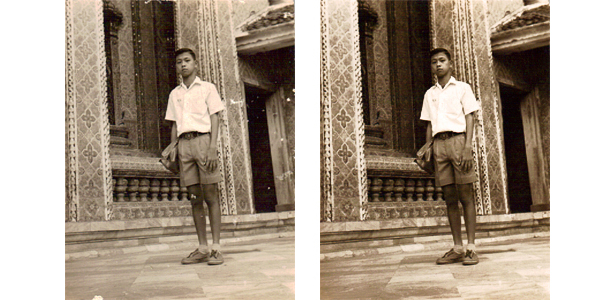
This image was scanned from a photo taken sometime in the 1960s. The original paper had been creased in a couple of places as well as bits and pieces of the paper having flaked away at the time of the scan. In addition to restoring those areas, the color and contrast was re–balanced and a photo filter applied to restore the original vibrancy.
Before & After: Image Reconstruction
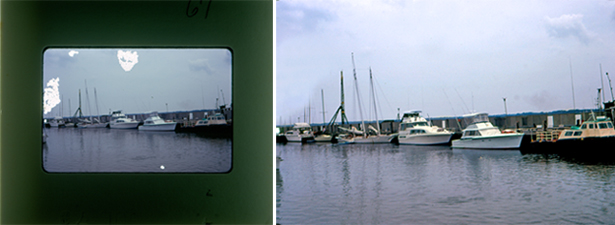
Here you can see the results of reconstructing the image of the 35mm slide that illustrates the “Retouching” panel. You can clearly see where the film had been damaged and how the remaining data has been cloned to fill in the blank areas. Additional steps were taken to brighten the image and achieve a uniform tone.
Before & After: Retouching

I like to use this example from the website I developed for Ivonne Frowein to illustrate how successful one can sometimes be in stitching two halves of an image together. Published as a double page spread, about a full quarter of an inch of the image was lost to the magazine’s gutter because of the way the original was cropped. The challenge was to align the halves properly and clone the missing data. If you did not have the “before” to compare with the “after,” do you think you could have spotted the seam?
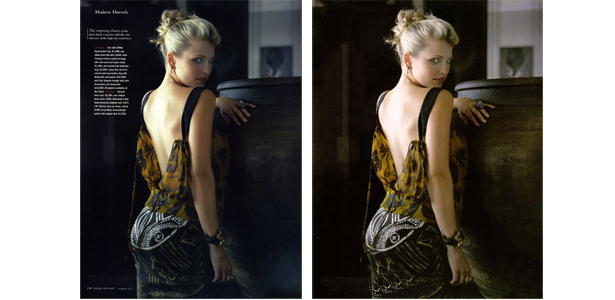
Here is an example of removing copy from an editorial image and re–balancing color, light, and shadow for Kathy Kalafut’s website. The original image was scanned from a tear sheet, which rendered deeper shadows and a sort of blue haze across the bottom. I was able to re–balance the shadows, which helped the large urn stand out, and to eliminate the haze. Then, I shifted the skin tones from yellow to pink and made the dress pop. Finally, I removed all the text on the left and recreated the background underneath.
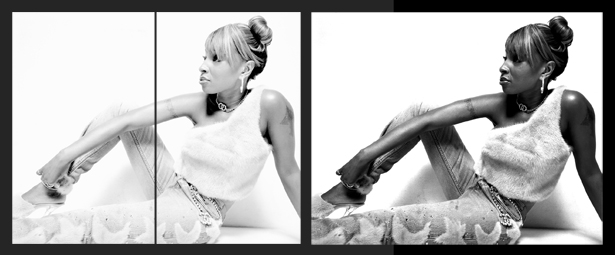
This is an example of one of the many images I have retouched for photographer Nicolai Grosell. In this case, I had actual B&W prints as my starting point. After scanning each original half, I aligned the halves and reconstructed about an eighth of an inch in the center. Then, I re–balanced the interplay between the blacks and whites in order to correct skin tone and dimensionality.
Next: Estimates
Fees for digital imaging services, like those for website based projects, are also geared more toward your specific project than a flat rate. Again, I am happy to work with you if you come to me with a set budget for a large project, but please understand that there is less of a cushion because fewer variables come into play.
Final Terms and Conditions will be stated in full in all formal quotes. For more information, please call or send an email to set up a consultation which is the first step in developing your cost estimate.
Contact Phone
917.863.6068
Contact Email
info@cdeatherage.net